阅读build-your-own-react总结

概要

原文出处:build-your-own-react
该文章旨在通过以下几步引导读者创建自己的React:

  • Step I: The createElement Function
  • Step II: The render Function
  • Step III: Concurrent Mode
  • Step IV: Fibers
  • Step V: Render and Commit Phases
  • Step VI: Reconciliation
  • Step VII: Function Components
  • Step VIII: Hooks

Step I: The createElement Function

createElement 函数的作用是根据指定的第一个参数创建一个React元素,可以用JSX来替代
下面是createElement的模拟代码:

1
2
3
4
5
6
7
8
9
10
11
12
13
14
15
16
17
18
19
20
21
22
23
function createElement(type, props, ...children) {
return {
type,
props: {
...props,
children: children.map(child =>
typeof child === "object"
? child
: createTextElement(child)
),
},
}
}

function createTextElement(text) {
return {
type: "TEXT_ELEMENT",
props: {
nodeValue: text,
children: [],
},
}
}
1
2
3
4
5
6
7
8
9
10
11
12
//JSX写法:

class Hello extends React.Component {
render() {
return <div>Hello, { this.props.toWhat }</div>
}
}

ReactDOM.render(
<Hello toWhat=‘world’>,
document.getElementById(‘root’)
)
1
2
3
4
5
6
7
8
9
10
11
12
// 转化为原生JS后的写法

class Hello extends React.Component {
render(){
return React.createElement(‘div’,null, `Hello,${this.props.toWhat}`)
}
}

ReactDOM.render(
React.createElement(‘Hello’, { toWhat: ‘world’ }, null),
document.getElementById(‘root’)
)

Step II: The render Function

render函数主要的作用就是将虚拟dom转化为真实dom,并挂载到container容器上。

1
2
3
4
5
6
7
8
9
10
11
12
13
14
15
16
17
18
19
20
21
22
23
24
// 以下代码只是第一版本,递归操作会有问题,后续步骤中会修改。
/*
Once we start rendering, we won’t stop until we have rendered the complete element tree. If the element tree is big, it may block the main thread for too long. And if the browser needs to do high priority stuff like handling user input or keeping an animation smooth, it will have to wait until the render finishes.(递归操作的问题)
*/
function render(element, container) {
// 根据ract元素类型不同创建相应的dom节点
const dom = element.type === 'TEXT_ELEMENT'
? document.createTextNode("")
: document.createElement(element.type)
// 将props上记录的非children属性添加到dom上
const isProperty = key => key !== "children"
Object.keys(element.props)
.filter(isProperty)
.forEach(name => {
dom[name] = element.props[name]
})
// 便利子节点,递归创建真是DOM
element.props.children.forEach(child =>
render(child, dom)
)

// 虚拟DOM转化来的真是DOM挂载到container上
container.appendChild(dom)
}

Step III: Concurrent Mode

考虑到上述版本的render函数无法打断的问题,这一步骤将render函数进行改良。So we are going to break the work into small units, and after we finish each unit we’ll let the browser interrupt the rendering if there’s anything else that needs to be done.
requestIdleCallback函数React-render并发模式的救世主,以下是MDN对该函数的介绍:

1
window.requestIdleCallback() 方法插入一个函数,这个函数将在浏览器空闲时期被调用。这使开发者能够在主事件循环上执行后台和低优先级工作,而不会影响延迟关键事件,如动画和输入响应。函数一般会按先进先调用的顺序执行,然而,如果回调函数指定了执行超时时间timeout,则有可能为了在超时前执行函数而打乱执行顺序。

注意:该函数只是在React早期版本使用,后期版本中采用scheduler package的方式,但原理都是充分利用了浏览器空闲时期。
那么问题来了,传统的虚拟DOM无法适应这种打断机制,因此React中采用了Fibers架构,来配合这种能够随时打断并回复执行的机制。

Fibers

React为每一个Element提供一个Fiber。

1
2
3
4
5
6
7
8
9
10
11
// 假设想要渲染的元素树如下所示:
Didact.render(
<div>
<h1>
<p />
<a />
</h1>
<h2 />
</div>,
container
)`

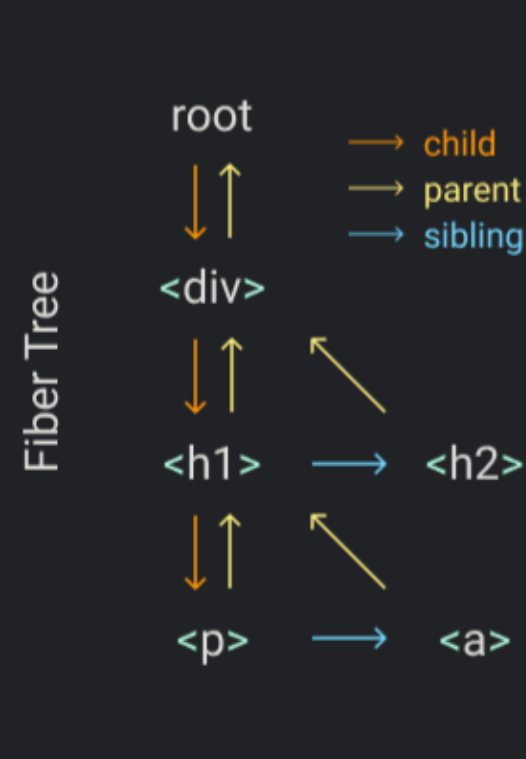
对应的Fibers Tree如下图:
pptfcAP.png

这种数据结构的目标之一是使查找下一个工作单元变得容易。这就是为什么每个Fiber都有一个链接到它的第一个孩子、下一个兄弟姐妹和它的父母。
Fiber工作的机制:
从根出发,孩子作为下一个工作单元,若没有孩子,则兄弟节点作为下一个工作单元,若既没有孩子也没有兄弟,则向上寻找其叔叔节点,也就是父亲节点的兄弟节点,直到再次回到兄弟节点为止。上述过程的顺序如下图:
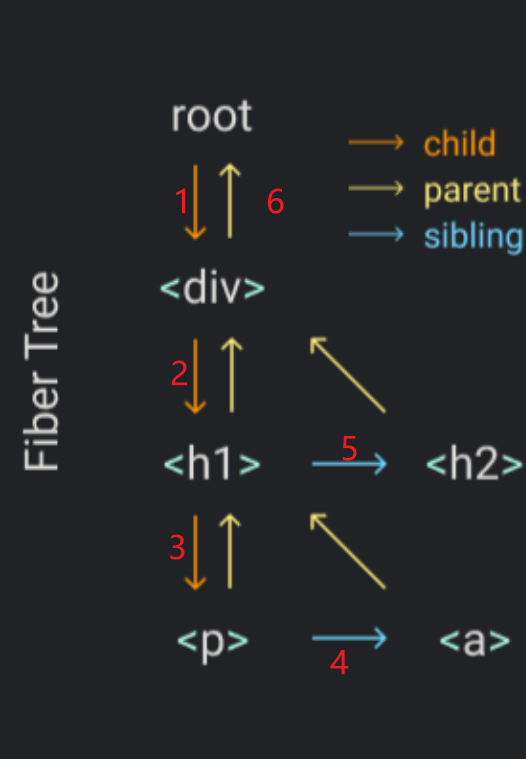
ppthcr9.png

Step V: Render and Commit Phases

由于React在Fiber渲染阶段可以随时被打断,若渲染之后立即提交的话,用户会看到不完整的UI,因为渲染随时可能被更高优先级的事件打断。因此在整个Fibers Tree渲染完成之前,React是不会进行提交操作的,也就是不会渲染真实DOM

Step VI: Reconciliation(调和阶段)

将render函数上接的元素与提交给DOM的最后一个元素Fiber进行对比。
因此在每次提交之前需要保存本次的FiberTree,这里叫currentRoot